Have you ever looked at a beautiful fairy pot garden and thought it must be too difficult or expensive to make yourself? The truth is that making your very own fairy pot garden at home is one of the easiest, most enjoyable, and most affordable DIY gardening projects you can ever do — even if you have never gardened before in your life.
In this complete step by step guide, you will learn exactly how to make a stunning fairy pot garden at home — from choosing the right pot and soil, to selecting the best plants, arranging your accessories, and caring for your magical miniature world once it is finished.
1. What You Need to Make a Fairy Pot Garden at Home
Before you begin making your fairy pot garden at home, gather all your supplies together in one place. Having everything ready before you start makes the whole process much smoother and more enjoyable from the very beginning.
Supplies You Need to Make a Fairy Pot Garden at Home:
- A pot or container with drainage holes
- Small pebbles or gravel for drainage layer
- Good quality potting mix
- Perlite or coarse sand for mixing into soil
- Three to four small slow-growing plants
- A miniature fairy house or cottage
- Small pebbles for pathways
- Miniature accessories like a bench, bridge, or figurines
- Natural elements like bark, pine cones, or small stones
- A small watering can with a gentle spout
- A small hand trowel or spoon for digging
Most of these supplies can be found at your local garden center, craft store, or dollar store. You do not need to spend a lot of money to make a beautiful fairy pot garden at home. Many experienced fairy gardeners use items they find completely in nature for free — pebbles from a garden path, twigs from the yard, pine cones from under a nearby tree.
2. How to Choose the Right Pot for Your Fairy Pot Garden at Home
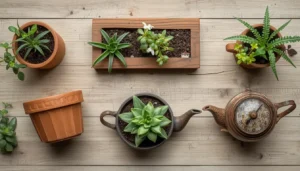
The very first step in making a fairy pot garden at home is choosing the right container. This is one of the most important decisions you will make because the container defines the size, shape, and overall mood of your entire miniature world.
Best Pot Types for Making a Fairy Pot Garden at Home
Terracotta Pot: A terracotta pot between ten and sixteen inches in diameter is the most popular and practical choice for making a fairy pot garden at home. Terracotta is breathable, affordable, easy to find, and gives fairy pot gardens a beautiful natural earthy look. Always make sure it has drainage holes at the bottom.
Ceramic Pot: Ceramic pots come in many beautiful colors and patterns and are perfect for themed fairy pot gardens at home. A blue glazed ceramic pot is perfect for a seaside fairy theme. Ceramic pots hold moisture longer than terracotta, which is helpful in hot weather months.
Wooden Planter: Wooden planters give fairy pot gardens a rustic woodland cottage feel. An old wooden crate, a barrel planter, or a handmade wooden box creates an instantly charming look. Line the inside with plastic sheeting before adding soil to prevent the wood from rotting quickly over time.
Upcycled Creative Containers: Old wheelbarrows, vintage teapots, cracked ceramic bowls, old boots, and hollowed-out logs can all be transformed into stunning fairy pot gardens at home. Any container must be deep enough to hold at least three inches of soil and must have adequate drainage holes.
Best Fairy Pot Garden Container Size for Beginners
For your very first fairy pot garden at home, a pot between ten and fourteen inches across is ideal. This gives you enough space to include three or four plants and a selection of accessories without things becoming overcrowded or difficult to manage.
3. How to Plan Your Fairy Pot Garden Design
Before planting anything at all, take a few minutes to plan your fairy pot garden design on paper. This simple step saves a lot of time and helps you clearly visualize the finished garden before you begin making it.
Draw a rough sketch of your container shape and decide where you want to place your main focal point plant, your fairy house, your pathways, and your accessories. A very simple sketch with circles and squares is more than enough to give you a useful starting plan to work from.
What to Decide When Planning Your Fairy Pot Garden at Home
- Where will your fairy house go — usually at the back or center of the pot
- Where will your tallest plant go — usually behind or beside the fairy house
- Where will your ground cover plants go — usually at the front and sides
- Where will your pathway go — usually winding from the front toward the fairy house
- Where will your bench, bridge, or other accessories go — scattered naturally around the design
Remember that in fairy pot gardening there are absolutely no strict rules. Your plan can change completely once you begin arranging things inside the pot — and that is perfectly fine. The plan is simply a starting point to spark your imagination and creativity before you begin.
4. How to Prepare Your Fairy Pot Garden Drainage
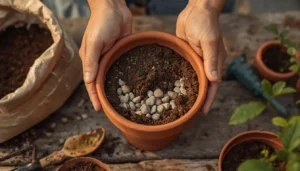
Good drainage is the single most important factor in keeping your fairy pot garden at home plants alive and healthy for a long time. Without proper drainage, water builds up at the bottom of the pot, roots begin to rot, and plants die surprisingly quickly.
Setting Up Your Fairy Pot Garden Drainage Layer at Home
Place a layer of small pebbles, gravel, or broken terracotta pot shards at the very bottom of your container before adding any soil. This drainage layer should be approximately one to two inches deep. It allows excess water to flow freely away from the root zone and prevents the drainage holes from becoming blocked with soil over time.
If your chosen container does not already have drainage holes — such as a decorative ceramic pot or a vintage teapot — you have two options. First, you can carefully drill drainage holes in the bottom using a masonry drill bit. Second, you can make your drainage layer significantly deeper — at least three to four inches — to act as a water reservoir below the root zone of your fairy pot garden plants.
5. How to Choose the Best Soil for Your Fairy Pot Garden at Home
Once your drainage layer is in place, it is time to add your potting mix. Using the right soil is just as important as good drainage for the long-term health of your fairy pot garden at home.
Best Soil Mix for Making a Fairy Pot Garden at Home
Always use a good quality potting mix rather than regular garden soil when making your fairy pot garden at home. Garden soil is too heavy for containers, compacts over time, drains very poorly, and often contains weed seeds and pests. Potting mix is specifically designed for container gardening and provides the right balance of drainage, aeration, and nutrients your fairy pot garden plants need.
Mix your potting mix with approximately twenty to thirty percent perlite or coarse sand to improve drainage further. This is especially important if your fairy pot garden at home includes succulents or other plants that dislike sitting in wet soil for extended periods of time.
How Much Soil to Add to Your Fairy Pot Garden
Fill your container with potting mix to within approximately two inches of the top rim of the pot. Leaving this gap at the top makes watering much easier and prevents soil and water from washing over the edges of your fairy pot garden every time you water your plants.
Gently press the soil down to remove large air pockets but do not compact it too firmly. Roots need some air space in the soil to grow well and stay completely healthy throughout the entire growing season.
6. How to Choose and Plant Fairy Pot Garden Plants at Home
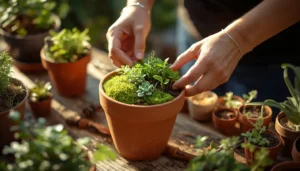
Choosing the right plants and arranging them well is where your fairy pot garden at home really comes to life. The plants you choose will define the look and atmosphere of your entire miniature world for months and years to come.
Golden Rule for Choosing Fairy Pot Garden Plants
Always choose plants that stay small, grow slowly, and have similar light and water requirements. Mixing plants with very different needs in the same fairy pot garden at home will result in some plants thriving beautifully while others die very quickly.
Best Ground Cover Plants for Your Fairy Pot Garden at Home
Irish Moss and Scotch Moss: These are among the very best ground cover plants for making a fairy pot garden at home. Both create a beautiful velvety green carpet that looks exactly like a soft fairy lawn. They grow slowly, stay very low to the ground, and work well in both sun and partial shade conditions throughout the year.
Creeping Thyme: Creeping thyme stays very low, releases a beautiful fragrance when touched, and produces tiny purple flowers in summer. It creates the perfect look of a miniature meadow and works beautifully along pebble pathways inside your fairy pot garden at home.
Baby Tears: Baby tears is a delicate plant with incredibly tiny leaves that cluster together and cascade beautifully over the edges of fairy pots and containers. It creates a lush soft look that is perfect for shaded and indoor fairy pot garden positions at home.
Best Accent Plants for Your Fairy Pot Garden at Home
Succulents: Echeveria, hens and chicks, and string of pearls are among the most popular accent plants for sunny fairy pot gardens at home. All succulents require very little watering, making them ideal low-maintenance fairy garden plants for beginners making their first garden.
Miniature Ferns: Ferns create an instantly magical woodland atmosphere in any fairy pot garden at home. Their delicate arching fronds look like miniature trees in a fairy forest and prefer shaded or partially shaded conditions with consistently moist soil.
Polka Dot Plant: The polka dot plant adds an instant burst of cheerful color and whimsy to any fairy pot garden at home. It stays relatively small and can be kept compact by regularly pinching new shoots throughout the growing season.
How to Arrange Plants in Your Fairy Pot Garden at Home
While plants are still in their nursery pots, place them on top of the soil inside your container and try different arrangements before planting anything permanently. Always position the tallest plant toward the back of the pot to create depth. Place medium-sized plants in the middle and low ground cover plants at the front and sides. Leave a little space between each plant for growth and to allow fresh air to circulate freely around the foliage.
7. How to Create Fairy Pot Garden Pathways and Features at Home
Once your plants are planted and settled into position, it is time to add the landscape features that truly transform a simple container garden into a magical fairy pot garden world at home.
Creating Pathways in Your Fairy Pot Garden at Home
Press small pebbles, crushed shells, or coarse sand gently into the surface of the soil to create a winding pathway through your fairy pot garden. A pathway that winds from the front edge of the pot toward the fairy house creates an instant sense of depth and tells the story that someone — or something — actually walks this path regularly every day.
Adding Natural Elements to Your Fairy Pot Garden at Home
Use flat stones as stepping stones along your pathway throughout the fairy pot garden. Place small pieces of bark or driftwood to create rustic garden features that look completely natural. Add tiny pine cones, small smooth river stones, or glass gems to fill spaces and add wonderful visual texture and interest throughout the entire fairy garden design.
Creating Hills and Levels in Your Fairy Pot Garden
Create a simple raised area in one part of your container by mounding extra soil slightly higher before planting your plants. This creates a gentle hill effect that adds wonderful depth and real dimension to your fairy pot garden landscape at home and makes the finished design look far more interesting and natural from every angle.
8. How to Place Your Fairy Pot Garden Accessories at Home
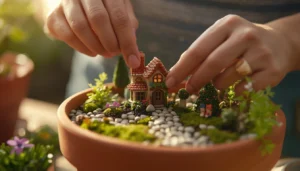
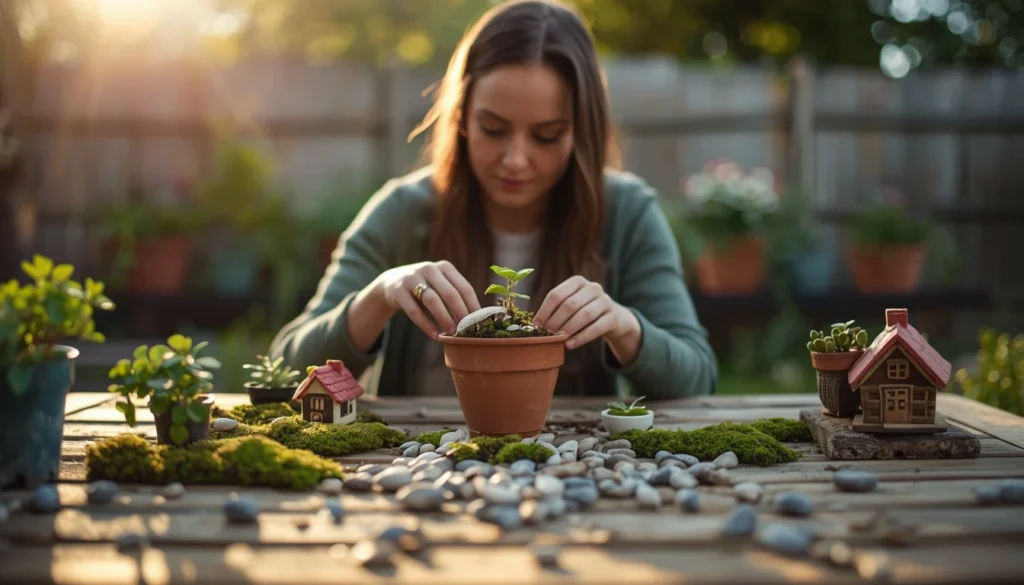
Now comes the most magical part of making a fairy pot garden at home — placing your fairy house and accessories into their final perfect positions inside the container.
How to Position Your Fairy House in Your Fairy Pot Garden
Position your fairy house as the main focal point of your fairy pot garden at home. Most fairy gardeners place the house toward the back or slightly to one side of the container. Press it gently but firmly into the soil so it sits completely level and very stable. Make sure the doorway faces outward so it can always be seen and fully appreciated from the front of your fairy pot garden.
How to Arrange Accessories in Your Fairy Pot Garden at Home
Place a miniature bench under your tallest plant as if a fairy is sitting there to rest in the shade. Position a tiny birdbath or water feature near the center of your fairy pot garden. Lean a miniature garden tool against the side of the fairy house to create a lived-in feeling. Place a fairy figurine on the pathway as if she is walking home after a long day.
Step back frequently as you arrange your accessories and look at the fairy pot garden from all angles. Rotate the pot slowly and check that it looks completely beautiful from every single direction. Adjust positions carefully until everything feels perfectly balanced, completely natural, and tells a magical little story.
9. How to Water Your Fairy Pot Garden Correctly at Home
Once everything is planted and arranged exactly the way you want it, give your new fairy pot garden at home its very first gentle watering session.
Use a small watering can with a gentle rose head or a narrow spout so you can direct the water precisely where you need it without disturbing your soil arrangements, washing away your carefully placed pebble pathways, or knocking over any of your delicate accessories.
Water slowly and gently until you see moisture beginning to drain steadily from the holes at the very bottom of your container. This confirms that water has reached all the way through the soil and that your drainage layer is working exactly as it should be throughout the entire fairy pot garden.
After watering your fairy pot garden at home, check that none of your plants have shifted position and none of your accessories have been accidentally disturbed by the water flow. Gently press everything back into its correct position if needed and add a little extra soil around any plants whose roots have become slightly exposed.
10. How to Find the Best Position for Your Fairy Pot Garden at Home
The final step in making your fairy pot garden at home is finding the ideal location where it will thrive and look its very best every single day.
Best Indoor Position for Your Fairy Pot Garden at Home
Place your indoor fairy pot garden near a bright window that receives good indirect light throughout the day. East or west facing windows are usually ideal for a fairy pot garden at home, providing several hours of gentle morning or afternoon sun without the harsh intensity of direct midday sunlight that can scorch delicate miniature plants and fade accessories over time.
Best Outdoor Position for Your Fairy Pot Garden at Home
Most outdoor fairy pot gardens do best in a position that receives morning sunlight and comfortable afternoon shade. Direct afternoon sun in summer can dry out the soil very quickly and scorch delicate miniature plants and accessories inside your fairy pot garden at home. A sheltered spot on a patio, balcony, or garden table is always a perfect position for an outdoor fairy pot garden.
11. How to Care for Your Fairy Pot Garden at Home All Year
Making your fairy pot garden at home is just the very beginning of the journey. Proper ongoing care will keep your magical miniature world looking beautiful for months and even years to come with very little effort required.
Watering Your Fairy Pot Garden at Home
Check the soil moisture regularly by pressing your finger about one inch into the soil before watering. Water your fairy pot garden at home only when the top inch of soil feels completely dry to the touch. Succulents need watering every seven to ten days. Ferns and moss need watering every two to three days throughout the growing season. Never let your fairy pot garden container sit in standing water as this causes dangerous root rot very quickly.
Pruning Your Fairy Pot Garden at Home
Trim any plants that are beginning to grow too large for your fairy pot garden design at home. Regular gentle pruning keeps plants beautifully compact, maintains the magical miniature scale of your garden, and encourages much bushier and healthier growth throughout the entire year.
Fertilizing Your Fairy Pot Garden at Home
Apply a diluted liquid fertilizer once a month during the growing season — spring through summer. Reduce or stop fertilizing completely in autumn and winter when most fairy pot garden plants grow much more slowly and need far fewer nutrients to stay healthy.
Seasonal Care for Your Fairy Pot Garden at Home
Refresh your fairy pot garden at home with each season by replacing any plants that have outgrown their space or finished blooming. Adding new seasonal accessories and plants to your fairy pot garden at home keeps the design feeling wonderfully fresh and exciting throughout every season of the entire year.
12. Quick Reference Table
| Step | Action | Key Tip |
|---|---|---|
| Step 1 | Gather Supplies | Get everything ready first |
| Step 2 | Choose Your Pot | Must have drainage holes |
| Step 3 | Plan Your Design | Draw a simple sketch first |
| Step 4 | Add Drainage Layer | 1 to 2 inches of pebbles |
| Step 5 | Add Soil | Potting mix plus perlite |
| Step 6 | Choose and Plant | Same light and water needs |
| Step 7 | Add Pathways | Small pebbles or coarse sand |
| Step 8 | Place Accessories | Fairy house as main focal point |
| Step 9 | Water Gently | Water until drainage appears |
| Step 10 | Find Position | Morning sun afternoon shade |
| Care | Water Regularly | Check soil before every watering |
| Care | Prune Monthly | Keep plants small and compact |
Conclusion
Making a fairy pot garden at home is one of the most magical, creative, and rewarding DIY projects you will ever take on as a gardener or creative person. By following these simple steps — gathering your supplies, choosing the right container, planning your design, setting up drainage, adding the right soil, selecting the best plants, creating pathways, placing your fairy house and accessories, watering gently, and finding the perfect position — you can create a truly stunning miniature world that brings joy and magic to your home every single day of the year.
Start simple, choose plants that suit your available conditions, let your imagination guide every single design choice you make, and enjoy every step of the entire process from beginning to end. Your fairy pot garden at home will grow and evolve beautifully over time — and that is part of the most special magic of creating a living miniature world that you can tend, update, and fall in love with again and again throughout every wonderful season of the year.
FAQs
Q1: How do I start making a fairy pot garden at home for the first time?
Ans: Start by choosing a terracotta pot between ten and fourteen inches across with drainage holes at the bottom. Add a pebble drainage layer, fill with good quality potting mix, choose three or four small slow-growing plants with similar needs, add a miniature fairy house, create a pebble pathway, and arrange a few small accessories around the fairy house. Water gently and place in a bright spot with morning sun and comfortable afternoon shade.
Q2: What is the best pot for making a fairy pot garden at home?
Ans: A terracotta pot between ten and sixteen inches in diameter is the best choice for making a fairy pot garden at home as a beginner. Terracotta is affordable, widely available, breathable for plant roots, and gives fairy pot gardens a beautiful natural look that suits every theme and style.
Q3: How many plants should I use when making a fairy pot garden at home?
Ans: For a standard ten to fourteen inch pot, three to four plants is ideal when making a fairy pot garden at home. Start with one taller focal point plant, one or two medium plants, and one ground cover plant. Avoid overcrowding as it leads to poor air circulation and plants competing with each other for valuable nutrients.
Q4: What soil should I use when making a fairy pot garden at home?
Ans: Always use a good quality potting mix combined with approximately twenty to thirty percent perlite or coarse sand to improve drainage. Never use regular garden soil in containers when making a fairy pot garden at home as it is too heavy, compacts easily, and drains very poorly over time.
Q5: How do I water a fairy pot garden at home without disturbing the accessories?
Ans: Use a small watering can with a narrow spout or a gentle rose head to direct water precisely where you want it inside your fairy pot garden at home. Water slowly and carefully around the base of your plants and avoid pouring water directly onto accessories or pebble pathways. Water until moisture appears steadily from the drainage holes at the very bottom of the container.
Q6: Can I make a fairy pot garden at home indoors?
Ans: Yes absolutely. Choose plants that tolerate lower light levels like miniature ferns, baby tears, spike moss, and polka dot plants for your indoor fairy pot garden at home. Position your indoor fairy pot garden near a bright east or west facing window that provides gentle indirect light throughout the day for the very best results.
Q7: How long does it take to make a fairy pot garden at home?
Ans: Most fairy pot gardens at home take between one and two hours to complete from start to finish. Gathering all your supplies beforehand, having a simple design plan ready, and working carefully through each step makes the entire process smooth, enjoyable, and very manageable even for complete beginners making their very first fairy pot garden.