
There is something inherently soul-soothing about the warm, rhythmic flicker of an oil lantern. In an age of sterile LED headlamps and aggressive smartphone flashes, the oil lantern remains a testament to timeless engineering and atmospheric charm. Whether you are preparing for an off-grid camping trip, bracing for a power outage, or simply looking to add a rustic glow to your patio, knowing how to use an oil lantern correctly is both a functional skill and an art form.
In this definitive guide, we will walk through everything from anatomy and fuel selection to the nuanced physics of wick trimming.
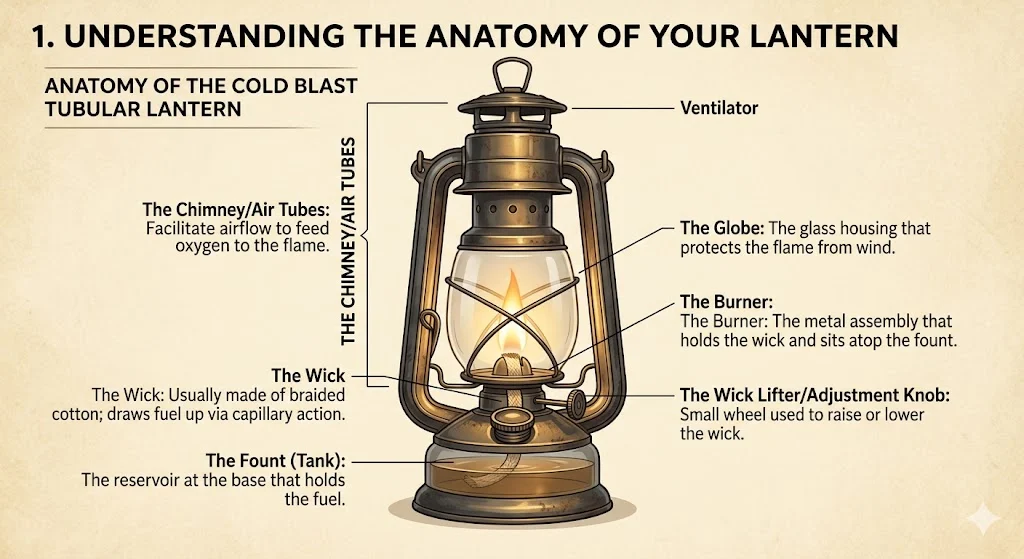
1. Understanding the Anatomy of Your Lantern
Before you strike a match, you need to know what you’re holding. Most modern oil lanterns (like the classic Dietz or Feuerhand models) are “cold blast” or “hot blast” tubular lanterns.
-
The Fount (Tank): The reservoir at the base that holds the fuel.
-
The Burner: The metal assembly that holds the wick and sits atop the fount.
-
The Wick: Usually made of braided cotton; it draws fuel up via capillary action.
-
The Globe: The glass housing that protects the flame from wind.
-
The Chimney/Air Tubes: These facilitate the airflow that feeds oxygen to the flame.
-
The Wick Lifter/Adjustment Knob: The small wheel used to raise or lower the wick.
2. Choosing the Right Fuel: Safety First
The most common mistake beginners make is using the wrong fuel. Never use gasoline, Coleman fuel, or alcohol in an oil lantern. These fuels are too volatile and can lead to explosions.
Recommended Fuels:
-
Kerosene (1-K): The gold standard for outdoor use. It’s affordable and burns efficiently, though it has a distinct “camp” smell.
-
Clear Lamp Oil: A highly refined version of kerosene. It is cleaner and virtually odorless, making it the best choice for indoor use.
-
Paraffin Oil: Often used for decorative “indoor” lamps. It burns very cleanly but can be more expensive. Note: In cold temperatures, paraffin can thicken and struggle to climb the wick.
3. Step-by-Step: Lighting Your Lantern for the First Time
Step 1: Filling the Fount
Unscrew the fuel cap. Use a small funnel to pour your chosen fuel into the fount.
Professional Tip: Never fill the tank to the very brim. Fill it to about 80% capacity. This allows for “thermal expansion” as the lantern heats up and prevents messy leaks.
Step 2: The “Soak” Period
This is the step most people skip. Once the fuel is in and the wick is installed, you must wait 20 to 30 minutes before lighting. This ensures the cotton fibers are completely saturated. Lighting a dry wick will simply burn the cotton, creating acrid smoke and ruining the wick.
Step 3: Trimming the Wick
For a steady, “batwing” shaped flame, your wick needs a clean edge.
-
Square Cut: Provides a standard, functional flame.
-
Crowned/Pointed Cut: Snip the corners of the wick slightly. This produces a more tapered, aesthetic flame and reduces “spiking” (when the flame corners grow too high and smoke).
Step 4: Lighting the Flame
-
Push the side lever down to lift the glass globe.
-
Turn the adjustment knob until about 1/8 inch of the wick is visible.
-
Touch a match or lighter to the wick.
-
Lower the globe back into place immediately.
4. Managing the Flame and Airflow
Once lit, the lantern needs a minute to “warm up.” As the metal and glass heat up, the draft increases, and the flame will naturally grow larger.
-
Avoid the “Smoke Zone”: If the flame is flickering wildly or releasing black soot, the wick is too high. Lower it until the flame is steady and clear.
-
The Sweet Spot: A perfect flame is usually about 1/2 inch to 3/4 inch high. It should look like an inverted teardrop or a bright leaf.
5. Maintenance: Keeping the Glow Alive
A well-maintained lantern can last for generations. Follow these professional upkeep tips:
Cleaning the Globe
Soot buildup is inevitable. Once the lantern is completely cool:
-
Lift the globe.
-
Wipe the inside with a soft cloth and a bit of glass cleaner or a vinegar-water solution.
-
Ensure it is completely dry before re-lighting, as moisture can cause the glass to crack under heat (thermal shock).
Storing Your Lantern
If you aren’t planning to use the lantern for several months, it is best to drain the fuel. Over time, fuel can degrade or absorb moisture, which leads to a “gummed up” wick that won’t light easily.
6. Safety Precautions for Modern Users
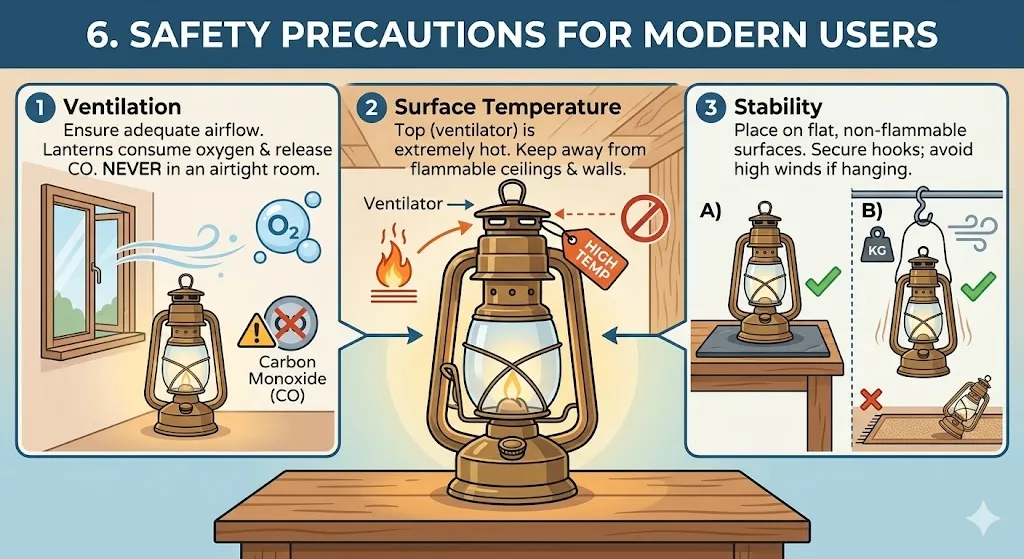
While oil lanterns are safer than open candles, they still involve fire and combustible liquids.
-
Ventilation: Never use a kerosene lantern in a small, airtight room. They consume oxygen and release trace amounts of carbon monoxide. Always ensure there is a cracked window or adequate airflow.
-
Surface Temperature: The top of the lantern (the ventilator) gets extremely hot. Never hang it directly against a flammable wall or under a low ceiling.
-
Stability: Always place the lantern on a flat, non-flammable surface. If hanging, ensure the hook is rated for the weight and won’t be swayed by high winds.
7. Troubleshooting Common Issues
Why is my lantern smoking?
-
Cause: The wick is too high or the fuel is “dirty.”
-
Fix: Lower the wick. if it persists, ensure you aren’t using “scented” oils which contain additives that often smoke more than clear oils.
Why won’t my wick stay lit?
-
Cause: Water in the fuel. Even a few drops of condensation in the fount will sink to the bottom (where the wick sits) and “drown” the flame.
-
Fix: Drain the tank, dry it out, and replace with fresh fuel and a new wick.
The glass globe cracked—why?
-
Cause: This usually happens due to thermal shock. If cold water hits a hot globe, or if the flame was pushed too high too fast, the glass expands unevenly and snaps.
-
Fix: Always increase the flame height gradually.
8. The Aesthetic Appeal: Why We Still Use Them
Beyond survivalism, oil lanterns provide a “CRI” (Color Rendering Index) that no LED can match. The light is rich in the red and orange spectrum, which mimics the setting sun and encourages the human body to produce melatonin. This makes them the perfect companion for “winding down” at a campsite or creating an intimate atmosphere for an outdoor dinner party.
Conclusion: Lighting the Way Forward
Mastering the oil lantern is a rewarding experience that connects us to a simpler era. By selecting the right fuel, allowing your wick to soak, and maintaining a clean globe, you ensure that your lantern remains a reliable tool rather than just a dusty antique.
The next time the power goes out or the stars come out, skip the flashlight. Reach for the oil lantern, strike a match, and enjoy the living, breathing glow of a classic flame.
Frequently Asked Questions
1. Can I use lamp oil and kerosene interchangeably?
Yes, but with caveats. While both will power a tubular lantern, lamp oil is a highly refined paraffin that burns cleaner and is virtually odorless, making it ideal for indoor use. Kerosene is more robust and cheaper, but it produces a noticeable “oily” smell and more soot. If you switch from kerosene to lamp oil, it is best to replace the wick, as the heavier kerosene residue can prevent the cleaner lamp oil from “wicking” properly.
2. How long will a single fill of oil last?
On average, a standard 12-ounce fount (tank) will provide between 12 to 14 hours of light, depending on the flame height. If you keep the wick low for a “night light” glow, you can stretch this to nearly 20 hours. Conversely, a high, “spiking” flame will consume fuel much faster and may cause the lantern to run dry in under 8 hours.
3. Why is my lantern glass turning black (sooting)?
Sooting is almost always caused by the wick being turned up too high. When the flame is too large, it cannot pull in enough oxygen to complete the combustion process, resulting in unburnt carbon (black soot) sticking to the glass. To fix this, lower the wick until the “spikes” at the corners of the flame disappear. Also, ensure you are using high-quality, clear fuel rather than colored or scented oils.
4. Is it safe to leave an oil lantern burning overnight?
No, it is not recommended. While oil lanterns are much more stable than open candles, they are still “active” combustion devices. There is always a small risk of the flame “creeping” (growing larger as the metal heats up) or the lantern being knocked over by a pet or a draft. Always extinguish your lantern before going to sleep or leaving a room to ensure maximum fire safety.
5. How do I know when it’s time to replace the wick?
You should replace your wick when it becomes too short to reach the bottom of the fuel fount or if the top has become “charred” and brittle despite frequent trimming. If you notice the flame flickering and dying even though the tank is full, the wick fibers may be clogged with impurities. A healthy wick should be soft, supple, and long enough to coil slightly at the bottom of the tank.