How to Remove a Bathroom Mirror from the Wall (A Complete Guide)
Bathroom mirrors are an essential part of any home, but there are times when you may need to remove one. Whether you’re renovating your bathroom, replacing an outdated mirror, or installing a new vanity mirror, removing a bathroom mirror from the wall requires careful handling.
Many bathroom mirrors are either mounted with clips or glued directly to the wall, and improper removal can damage the drywall or break the mirror. In this detailed guide, you will learn how to remove a bathroom mirror from the wall safely, the tools you need, and professional tips to make the process easier.
Why You May Need to Remove a Bathroom Mirror
Bathroom mirrors are usually installed to last many years. However, there are several reasons homeowners decide to remove them.
1. Bathroom Renovation
If you are remodeling your bathroom, the existing mirror may not match the new design. A new vanity, lighting fixtures, or tiles can make an old mirror look outdated. Removing the mirror allows you to create a more modern and cohesive bathroom style.
It also allows you to install a mirror that better suits your updated layout.
2. Mirror Replacement
Old mirrors can develop black edges, scratches, or stains, making replacement necessary. These signs usually appear due to moisture exposure in bathrooms over time. A damaged mirror can reduce the overall appearance of the space. Replacing it with a new mirror can instantly refresh the bathroom’s look.
3. Installing a Framed Mirror
Many homeowners replace builder-grade mirrors with stylish framed mirrors to improve the overall aesthetic. Framed mirrors add personality and decorative value to the bathroom. They are available in materials like wood, metal, and modern composite frames.
Upgrading to a framed mirror can make the bathroom feel more elegant and complete.
4. Wall Repair or Painting
Sometimes mirrors must be removed to repaint the wall or repair damage behind them. Over time, moisture and adhesive can leave marks or damage the drywall. Removing the mirror makes it easier to patch holes, fix cracks, and repaint the surface. This ensures the wall looks clean and smooth before installing a new mirror.
Tools You Will Need
Before removing the mirror, gather the proper tools to ensure the job is safe and efficient.
Basic tools include:
-
Safety gloves
-
Safety goggles
-
Painter’s tape or masking tape
-
Putty knife
-
Pry bar
-
Screwdriver
-
Heat gun or hair dryer
-
Suction cups (optional but helpful)
-
Drop cloth or towel
Using the right tools helps prevent injuries and wall damage during the removal process.
Step-by-Step Guide to Remove a Bathroom Mirror
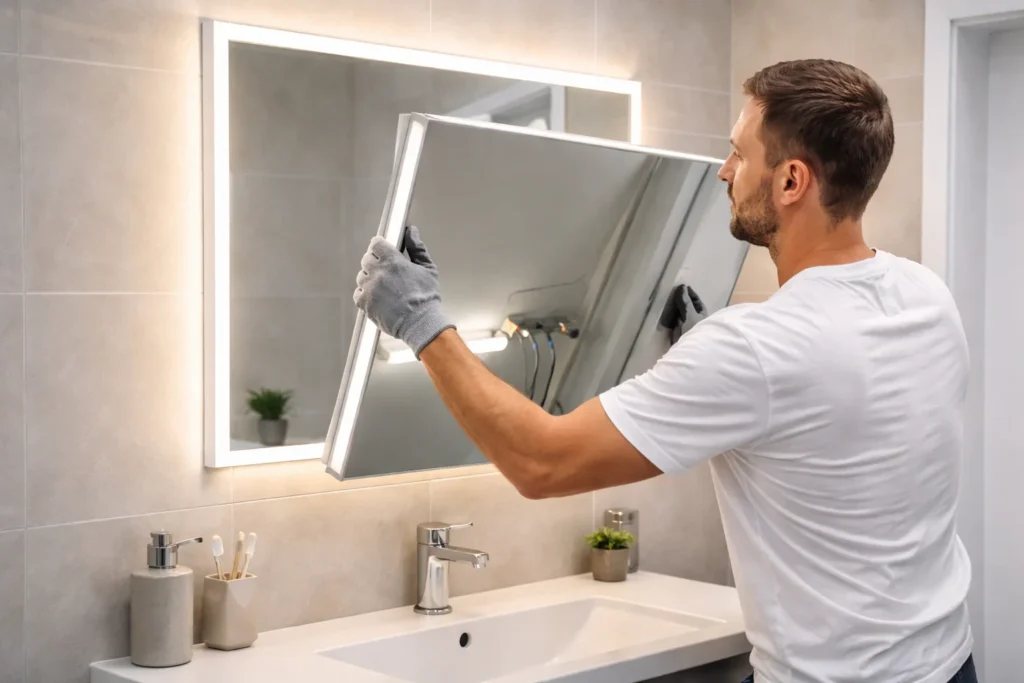
Step 1: Protect the Mirror Surface
Start by placing painter’s tape across the mirror in an “X” or grid pattern. This step is extremely important. If the mirror breaks during removal, the tape will hold the glass pieces together, reducing the risk of injury. Also, place a drop cloth or thick towel on the sink and floor to catch debris.
Step 2: Determine How the Mirror Is Mounted
Bathroom mirrors are usually installed in two ways:
1. Mirror Clips: Small metal clips hold the mirror in place.
2. Adhesive or Glue: The mirror is glued directly to the wall using construction adhesive. Knowing the installation method helps you choose the correct removal technique.
Step 3: Remove Mirror Clips (If Present)
If your mirror is attached with clips:
-
Use a screwdriver to remove the screws holding the clips.
-
Hold the mirror firmly while removing the final clips.
-
Carefully pull the mirror away from the wall.
This is the easiest type of mirror to remove.
Step 4: Loosen the Adhesive (For Glued Mirrors)
If the mirror is glued to the wall, removal requires more patience.
Use one of these methods:
Heat Method
Use a hair dryer or heat gun to warm the adhesive behind the mirror. Heat softens the glue and makes it easier to detach.
Pry Method
Insert a putty knife or pry bar gently behind the mirror and slowly work it around the edges.
Avoid applying too much force to prevent breaking the mirror.
Step 5: Use Suction Cups for Support
Suction cups provide extra grip and control while removing the mirror.
Attach them to the mirror surface and pull slowly while loosening the adhesive with a putty knife.
This technique is commonly used by professionals.
Step 6: Carefully Lift the Mirror
Once the adhesive loosens:
-
Hold the mirror with both hands
-
Slowly pull it away from the wall
-
Lift it carefully and place it on a soft surface
Bathroom mirrors can be heavier than they appear, so consider asking someone to help.
What to Do After Removing the Mirror
After removing the mirror, you may notice adhesive residue or wall damage.
Remove Adhesive Residue
Use a putty knife or adhesive remover to scrape off leftover glue.
Repair the Wall
Fill holes or dents using joint compound or wall filler.
Sand and Repaint
Once the wall is smooth, sand it lightly and repaint if necessary.
Safety Tips for Removing a Bathroom Mirror
Removing mirrors involves handling large pieces of glass, so safety is critical.
Follow these tips:
-
Always wear protective gloves and goggles
-
Never pull the mirror too quickly
-
Use tape to prevent glass from shattering
-
Ask someone to help with large mirrors
-
Work slowly and carefully
These precautions significantly reduce the risk of injury.
Common Mistakes to Avoid
Many DIY homeowners make mistakes when removing mirrors. Avoid the following:
Applying Too Much Force
Pulling the mirror too hard can break it instantly.
Skipping Safety Tape
Without tape, shattered glass can cause serious injury.
Not Checking the Mounting Method
Trying to pry a clipped mirror can damage the wall unnecessarily.
Working Alone with Large Mirrors
Large mirrors are heavy and difficult to control.
When to Hire a Professional
Sometimes removing a bathroom mirror can be challenging.
You should consider hiring professionals if:
-
The mirror is very large
-
It is fully glued with strong adhesive
-
The mirror is installed inside tiles or wall panels
Professionals have specialized tools and experience to remove mirrors safely without damaging the wall.
Conclusion
Removing a bathroom mirror from the wall may seem difficult, but with the right tools and careful technique, it can be done safely. The key is to identify the mounting method, protect the mirror surface, and work slowly while loosening clips or adhesive. Whether you are upgrading your bathroom design or replacing an old mirror, following this step-by-step guide will help you complete the job without damaging your walls or the mirror. Taking proper safety precautions and using the correct tools will make the mirror removal process much easier and stress-free.
For further guidance about mirror removal, visit:https://newhomeessentials.com/how-do-you-remove-mirrors-from-the-wall/
Frequently Asked Questions (FAQ)
1. Can I remove a glued bathroom mirror without breaking it?
Yes, it is possible by using heat, a putty knife, and suction cups to gradually loosen the adhesive.
2. How do I know if my mirror is glued or clipped?
Check the edges of the mirror. If you see metal clips, it is clipped. If not, it is likely glued to the wall.
3. How long does it take to remove a bathroom mirror?
Most mirrors can be removed within 30 minutes to 1 hour, depending on the installation method.
4. What should I do if the mirror breaks during removal?
Wear gloves and carefully collect the pieces. Tape on the mirror usually prevents pieces from scattering.
5. Can I reuse the mirror after removing it?
Yes, if the mirror is removed without breaking and the edges remain intact, it can be reused or installed elsewhere.